This article shows the basic setup of a React app including the configuration on Redux state management and Redux Saga for asynchronous state side effects. In addition to that, the testing setup will be explained. Please note that you can do this exactly the same way in a React Native app!
So this article will be about:
- Setting up a basic React app
- Configuring Redux with your application
- Adding Redux Saga middleware to your Redux configuration
- Showing how to work with Redux + Saga, including queuing calls without parallelizing them (like uploading file one after another, but not simultaneously)
- Testing your user interface (components)
- Blackbox testing your Redux Saga functions against a Mock API
The Scenario
As an imaginary scenario, we have a simple frontend (React or React Native app) and a server. There is gonna be one GET call that the app will perform. This request is to be sent against https://example-api.com/test. The response is a JSON that contains a value, for example { increment: 42 }.
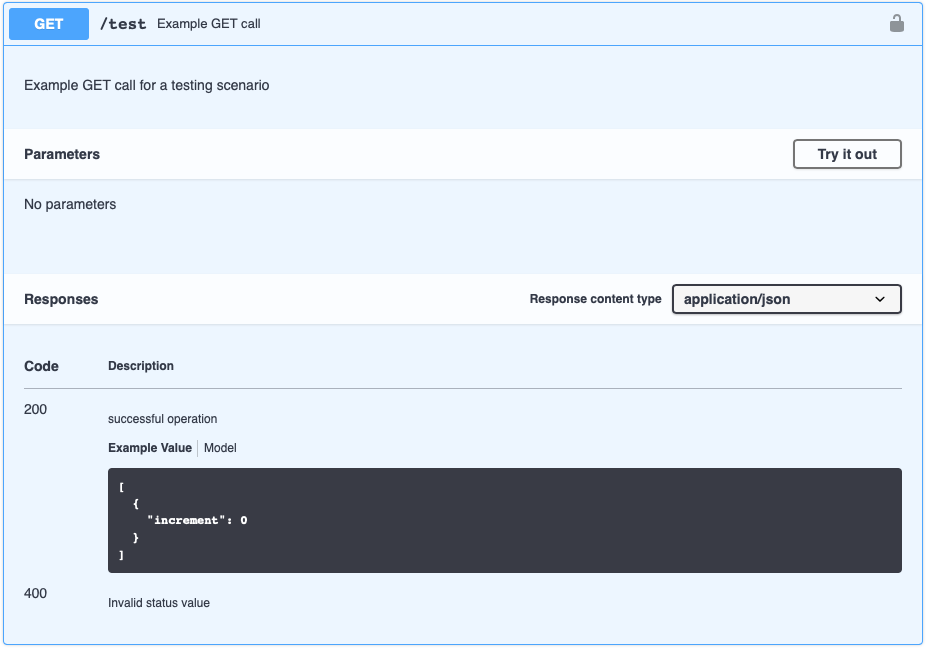
The screenshot shows the Swagger definition of that example request. Swagger allows you to define your API by following the OpenAPI specification. You can easily design your requests, responses and show examples. This can help when developing your application, especially since you can generate your HTTP client(s) for many programming languages.
On a successful request, the HTTP response should contain an increment that is used to increase a local counter. Since this article is focused on the different ways of using Redux Saga, we need a button for each of these types. We will also need to display this counter. In the end, the example application can look like the following:
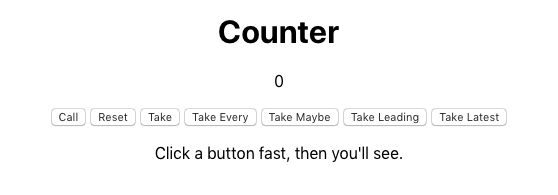
On click, the buttons fire off the named request related to Redux Saga. Call will fire a request that should only happen once at a time, without being parallelized. This can be useful if you want to do uploads in a specific order (first in - first out) and only one at a time (bad mobile connectivity).
Basic React App
All code snippets use yarn instead of npm, which is just a personal preference of me. The full source code can be found on Github. Since the application is based on React, we can just create a new React app using the command line interface and install all necessary dependencies for testing and development:
| npx create-react-app react-saga-testing | |
| cd react-saga-testing | |
| yarn add redux react-redux redux-saga | |
| yarn add --dev enzyme enzyme-adapter-react-16 fetch-mock node-fetch redux-saga-tester sinon | |
| yarn start |
At the root of our application we have the <App /> component. In a bigger application, this could contain a Router so that you can switch between multiple screens (such as locations like /profile). This example will just host a <Home /> component that includes the buttons and text, which will be added later:
| import React from 'react'; | |
| import ReactDOM from 'react-dom'; | |
| ReactDOM.render(<App />, document.getElementById('root')); | |
| const App = () => ( | |
| <div> | |
| <Home /> | |
| </div> | |
| ); | |
| const Home = () => ( | |
| <div> | |
| <p>There will be some buttons and text...</p> | |
| </div> | |
| ); |
As you can see, these are the most important lines of code for this basic example, without any Redux configuration. The React application will be rendered at an html element with the id "root".
Next, we should define the functionality for the <Home /> component. The props (or "input") of this component is a counter (number) and functions that do something with this counter. At this point of time we have no implementation of these functions:
| /* src/Home.js */ | |
| import React from 'react'; | |
| const Home = ({ | |
| counter, | |
| makeCall, | |
| takeEvery, | |
| /* ... */ | |
| }) => ( | |
| <div> | |
| <p id="testCounter">{counter}</p> | |
| <button id="testButton" onClick={() => makeCall()}> | |
| Call | |
| </button> | |
| <button onClick={() => takeEvery()}>Take Every</button> | |
| /* ... */ | |
| </div> | |
| ); |
Also, we decided that the state of this component is not inside the component itself, but centrally managed by a Redux store. This gives the benefit of code separation (code is easier to manage), better testability (you will see that later) and using the state's counter in different components. You may find my Redux article here.
Setup Redux + Redux Saga
Probably the most difficult part of Redux (in my opinion) is the initial setup. Especially if you are not familiar with JavaScript, this might become a pain. Actually, it is a pretty simple thing. You create a function that takes an initial state and returns a Redux store. Now, in some applications it might make sense (but is not the cleanest way) to have this store being globally available.
Very important is, that you only configure your store once. Other things that the Redux store has besides a state is a root reducer that manipulates the state, and optionally a middleware on top like Redux Saga, Redux Logger or Redux Persist. In this example, the store is configured like the following:
| /* src/store/configureStore.js */ | |
| import { createStore, applyMiddleware } from "redux"; | |
| import createSagaMiddleware from "redux-saga"; | |
| import { rootReducer, initialState } from "./rootReducer"; | |
| import { rootSaga } from "./rootSaga"; | |
| export default const configureStore = (state = initialState) => { | |
| const sagaMiddleware = createSagaMiddleware(); | |
| const store = createStore( | |
| rootReducer, | |
| state, | |
| applyMiddleware(sagaMiddleware) | |
| ); | |
| sagaMiddleware.run(rootSaga); | |
| return store; | |
| } |
This also shows, that after we have created store, we have to start the Redux Saga middleware. Optionally, you can bind the run() function to the store, so you can start it later.
Reducer
A reducer is a function that takes the current Redux state plus a self-defined action and returns a new state based on that action, if applicable. In this example, there is only one reducer necessary. Bigger applications may split their Redux store in different parts, so that not each reducer has access to the whole state. Then things like persisting whole parts of a store can be done easier. This can also lead to performance improvements, since every time you change the store, the subscribed components may need to re-render.
The actions and action types can generally be defined as you want. Mostly, action types are strings and actions may take an object as an input and return the action type plus the function input. When I first worked with Redux this did not make sense to me. But after a while, I realized that the code separation can be useful, as well as the possibility of auto importing these action function (I use Visual Studio Code as an IDE).
| /* src/store/rootReducer.js */ | |
| const TEST_INCREMENT_ACTION = "TEST_INCREMENT_ACTION"; | |
| const RESET_ACTION = "RESET_ACTION"; | |
| export const testIncremenReduxAction = ({ increment }) => ({ | |
| type: TEST_INCREMENT_ACTION, | |
| payload: increment | |
| }); | |
| export const resetAction = () => ({ | |
| type: RESET_ACTION | |
| }); |
A root reducer may consist of multiple other reducers. Each have their own part of the state. In this example, there is only one reducer called exampleReducer, which is defined under exampleReducer and exported via the combineReducers function. The reducer itself just checks for the specific action to be dispatched and returns a new store accordingly.
| /* src/store/rootReducer.js */ | |
| import { combineReducers } from "redux"; | |
| const exampleReducer = (state = { counter: 0 }, action) => { | |
| switch (action.type) { | |
| case TEST_INCREMENT_ACTION: { | |
| return { | |
| ...state, | |
| counter: state.counter + action.payload | |
| }; | |
| } | |
| default: | |
| return state; | |
| } | |
| }; | |
| export const rootReducer = combineReducers({ | |
| exampleReducer | |
| }); |
Saga
Redux Saga is a middleware on top of Redux, that can handle side effects such as requests for you. Thereby can trigger a saga the same way as a Redux action, while having the option to invoke effects such as dispatching Redux actions to manipulate the state, or retrieving values from the state. This explains why it needs to be configured while configuring the Redux store.
From a JavaScript perspective, Saga functions are generators. A generator function, written as function *, can pause its execution and continue until the next yield statement. This gives the possibility of writing functions that never stop (while (true)) so that you can always do things in a specific, repetitive order. Another benefit of using iterators is the handling of large or unknown-sized data sets. With iterators, you "just" iterate/step while there is something available. A similar thing in the Java world are Streams.
Redux Saga provides some high-level functions that can help you with handling asynchronous tasks. These helpers are built on the low-level effects take and fork. Forking a saga basically means that you invoke a function in a non-blocking way and get a Task as a result. This Task can be checked for still be running, be cancelled or more. This article will show a custom usage of these functions. Most of your use cases will probably rely on fork and not on spawn, since you usually don't want detached code in your application.
The sendMediaSaga saga function does the previously described request, in order to increment a counter in our state. For that, we use the Redux Saga call function, which invokes a given (generator) function. After the result has been retrieved, we put (dispatch) the Redux action, in order to change the state. If you want this to happen synchronously, you may use putResolve.
| /* src/store/rootSaga.js */ | |
| //... imports | |
| function* sendMediaSaga() { | |
| const result = yield call(fetch, 'https://example-api.com/test'); | |
| const { increment } = yield result.json(); | |
| yield put(testIncremenReduxAction({ increment })); | |
| // yield put({ type: 'TEST_INCREMENT_ACTION', payload: increment }) | |
| } |
Non-Parallelized Task Queuing
Queuing in Redux Saga can be achieved by using channels. It generally provides a way to communicate (asynchronously) between sagas. You could, for example, track the progress of an upload and pass the values through a callback and via channel to the Redux store (dispatch actions).
What we want to achieve is a custom, non-parallelized queuing of incoming actions (like uploads). The code will have a similar effect to the one described here, except that you can adjust the number of parallel "worker threads" (like having exactly two uploads running at the same time).
First and foremost, we need to create a saga that watches (take) for the specific action type to happen, and then invokes the sendMedia saga (call). This invocation happens in a blocking way, so that we wait for the call to finish, before we watch for another one. Please note that in order to not loose any requests, you need to take on a channel.
At next, we need to actually create the generic Saga channel. Then, we fork a specific amount of Saga's, that act like "worker threads". So each handleRequest Saga continuously watches on this one channel for a specific action. In the last part of the mediaQueueSaga, we need to watch for the specific action to be dispatched to the middleware, followed by a put to this channel.
Overall, the channel acts like a communication element between the dispatching and execution of these actions. This is how the code may look like:
| /* src/store/rootSaga.js */ | |
| //... imports | |
| function* handleRequest(chan) { | |
| while (true) { | |
| const action = yield take(chan); | |
| yield call(sendMediaSaga, action); | |
| } | |
| } | |
| function* mediaQueueSaga() { | |
| // create a channel to queue incoming requests | |
| const chan = yield call(channel); | |
| // create 1 worker 'threads' | |
| for (let i = 0; i < 1; i++) { | |
| yield fork(handleRequest, chan); | |
| } | |
| while (true) { | |
| const action = yield take(SEND_MEDIA_SAGA_ACTION); | |
| yield put(chan, action); | |
| } | |
| } |
At last, we need to setup the root Saga. In our case, we will simply use the all effect with an array of our used Sagas, so that they are forked in parallel. We may get an array of task descriptors, which we will not use here. There are several different ways of setting up the root Saga, but this is the one that works for our use case:
| /* src/store/rootSaga.js */ | |
| //... | |
| function* exampleSagas() { | |
| yield takeEvery(TAKE_EVERY_SAGA_ACTION, sendMediaSaga); | |
| yield takeLatest(TAKE_LATEST_SAGA_ACTION, sendMediaSaga); | |
| yield takeLeading(TAKE_LEADING_SAGA_ACTION, sendMediaSaga); | |
| } | |
| export const rootSaga = function* rootSaga() { | |
| yield all([ | |
| fork(mediaQueueSaga), | |
| fork(exampleSagas), | |
| ]); | |
| }; |
Other Task Handling
takeEvery takes actions concurrently , even if there is a previous action pending. That means, parallel requests are allowed. In our example, multiple actions dispatched to this helper (by clicking fast on the button) would lead to the counter being increased nearly at the same time.
takeLatest always keeps the latest actions running. It would cancel any action started previously. In our example, clicking fast may lead to cancelling previous request(s).
takeLeading looks similar to the handleRequest Saga, code-wise. So it only takes an action of none is currently running. In our example, clicking fast may lead to requests being lost.
Connect Redux with the UI
Now that we have set up Redux, we need to configure our components to get access to the store. At some point we want to subscribe to changes to the state (in order to display the counter) and dispatch actions to the store (when clicking on a button). For that, we need to wrap a Provider around a parent component and pass the configured Redux store to it:
| /* src/App.js */ | |
| import React from "react"; | |
| import { Provider } from "react-redux"; | |
| import { HomeContainer } from "./Home"; | |
| import { configureStore } from "./store/configureStore"; | |
| const store = configureStore(); | |
| export const App = () => { | |
| return ( | |
| <div> | |
| <Provider store={store}> | |
| <HomeContainer /> | |
| </Provider> | |
| </div> | |
| ); | |
| } |
Note that we have changed the initial <Home /> into <HomeContainer />. The reason for that is the connection to Redux. It is an often seen and good approach (in my opinion) to export a pure component/function and redux-connected function separately. This is very helpful when testing, which you will see later.
| /* src/Home.js */ | |
| /* ... */ | |
| import { connect } from "react-redux"; | |
| /* ... */ | |
| export const HomeContainer = connect( | |
| state => ({ | |
| counter: state.exampleReducer.counter | |
| }), | |
| dispatch => ({ | |
| makeCall: () => dispatch(queuedSagaAction()), | |
| takeEvery: () => dispatch(takeEverySagaAction()) | |
| /* ... */ | |
| }) | |
| )(Home); |
The <HomeContainer /> component is created by the react-redux connect function, also called high order component/function (function that takes a component and returns a new function). This function takes exactly two parameters (also functions):
- mapStateToProps: function that has the
stateof the Redux store as an input and should return an object with values of the state that you want for this component asprops - mapDispatchToProps: Function that has the
dispatchfunction of the Redux store as an input and should return an object with functions that you want to dispatch to the store (Redux or Saga actions) for this component asprops
So you could say, Redux connect maps (connects) the Redux store to a component.
User Interface Test
When it comes to testing in frontend applications, user interfaces are often not tested automatically. The problem is that once your UI changes, you may need to adjust many tests. Specifically end-to-end tests, where you define IDs for your element to be discoverable. But especially for critical applications or parts of it you will need tests.
In the following two UI tests I will show the usage of Enzyme, which is a testing utility library for React that helps with testing your component's output.
The first test should check wether the component actually renders a given counter value. First, we need to retrieve the render output from our test component. For that, we use Enzyme's shallow function, leading to a rendering of just this component. An alternative would be mount, which would render the child components, too. We also pass 42 via the components's props and expect the specific text element to have that number as a text. Note that we do not use the <HomeContainer /> component, since testing a component with Redux can be quite complicated and is just not necessary here.
| /* src/store/__tests__/ui.test.js */ | |
| import React from "react"; | |
| import Enzyme, { shallow } from "enzyme"; | |
| import Adapter from "enzyme-adapter-react-16"; | |
| import { Home } from "../../Home"; | |
| Enzyme.configure({ adapter: new Adapter() }); | |
| it('should display counter value "42"', () => { | |
| const app = shallow(<Home counter={42} />); | |
| const counter = app.find({ id: "testCounter" }); | |
| expect(counter.text()).toEqual("42"); | |
| }); |
The second test introduces a new UI behavior: test that a click on a button invokes a function that is passed via the <Home /> component's props. This requires the test suite to check wether the passed function was called, after clicking on a button. For that we use Sinon, which allows us to simply "spy" for the function to be called once:
| /* src/store/__tests__/ui.test.js */ | |
| //... | |
| it('should handle button click event', () => { | |
| const onButtonClick = sinon.spy(); | |
| const app = shallow(<Home makeCall={onButtonClick} />); | |
| const button = app.find({ id: 'testButton' }); | |
| button.simulate('click'); | |
| expect(onButtonClick.calledOnce).toBe(true); | |
| }); |
Black Box Functionality Test
Testing in general can be done in many different ways. Most common are white box testing (tester knows internal structures of the testing system), black box testing (tester only knows the system as a black box, meaning input and output) and grey box testing (mix of both).
When it comes to testing Redux Saga, you may have the same choice of doing black box or white box testing. White box would mean that you test your saga in a way so that you step through the saga (generator function) and thus check each of its yield outcome. In my experience, this can become quite complex and hard to maintain. As soon as you change a saga's yield order, tests need be adjusted. Tests should be written in a simple way, otherwise you may have even less motivation of writing them.
Black box testing is a great way for testing sagas. For that, redux-saga-tester is being used. It allows us to check the state of the store, dispatch actions and wait for specific actions to happen. In our case this is enough to test the functionality of the saga. This test will also include the reducer:
| /* src/store/__tests__/saga.test.js */ | |
| import SagaTester from "redux-saga-tester"; | |
| import { rootSaga, queuedSagaAction } from "../rootSaga"; | |
| import { rootReducer } from "../rootReducer"; | |
| // enable mock api so that test environment goes against fake server | |
| require('../../mock-api.js'); | |
| const delay = (t) => new Promise(res => setTimeout(() => res(), t)); | |
| describe("root saga", () => { | |
| it("should handle 4 button clicks one after another", async () => { | |
| const sagaTester = new SagaTester({ | |
| reducers: rootReducer | |
| }); | |
| sagaTester.start(rootSaga); | |
| sagaTester.dispatch(queuedSagaAction()); | |
| sagaTester.dispatch(queuedSagaAction()); | |
| sagaTester.dispatch(queuedSagaAction()); | |
| sagaTester.dispatch(queuedSagaAction()); | |
| await delay(5000); // wait for 4 request * max 1sec each | |
| const state = sagaTester.getState(); | |
| expect(state.exampleReducer.counter).toEqual(4); | |
| }, 10000); | |
| }); |
As you see, setting up the SagaTester and dispatching actions to it is pretty straight forward. The interesting part here is the arbitrary timeout. This is due to the asynchronous requests we do.
Fetch Mock API
Testing your application against a backend may become expensive or complicated due to things like authentication. It may also be the case that the backend is not fully developed yet, or you just want to reduce load. For that, a mock API can be useful. The goal of it is to "fake" the backend or specific parts of it.
We will use fetch-mock, a library that imitates HTTP requests. Our API is pretty simple, since we only need one GET request against /test. The mock API is configured using the following code. You need to import this configuration at an early point in your application (if you want to run your deployed application against it), on top of your test setup.
| /* src/mock-api.js */ | |
| import fetchMock from 'fetch-mock'; | |
| fetchMock.get(`glob:https://example-api.com/test`, () => { | |
| return new Promise(resolve => { | |
| setTimeout(() => { | |
| resolve({ | |
| status: 200, | |
| body: { increment: 1 }, | |
| }); | |
| }, 1000) // simulate server work/load | |
| }); | |
| }); |
Using a mock API, you can also test how your application reacts on specific responses, such as HTTP 403, 502 or simply long pending requests.
Conclusion
Redux Saga provides a great way to handle side effects in your application as you want it to. For that, you have to understand what you do and even more how to test your code. Black box testing comes in pretty useful here. Furthermore, the testing could be improved by a proper (even cross-browser) End-to-End testing suite.